Tips Blog
07/2019 - TIP - MISINFORMATION!!
While browsing the net for interesting tips that I might share with you in future blogs, I became quite dismayed at the amount of misinformation being put out by so-called experts.
Now I do realize that needlework is highly personal, and everyone has their own favorite techniques - and I will also be the first to say there are some wonderfully informative sites out there, that you can learn a lot from.... and you may have heard me mention the three examples (below) in other blogs, but I want to reinforce them, in case you haven't had time to read my blog history (wink).
One 'expert' stated quite firmly that you should NEVER use a hoop, as it could make your work dirty! This was the exact opposite of what the next few sites had to say, LOL, and also not what I think. Working "in-hand" (w/o a hoop) is something that can be hard to learn (especially for beginners), as you have to watch your tension very carefully... and though I have several friends who LOVE this method, I find that no matter how good you are at it, the finished product just isn't as crisp and even as that worked with a hoop. Tension is SOOOO important when stitching - the more even the tension, the more even the stitches - and a nice taut hoop really makes that easier.
However, IF you are worried about the hoop making your work dirty, there are several steps you can take. One is to remove the hoop when you're not stitching. This is something I suggest you do ANYWAY, lol, as it will also help avoid stretching the fabric (or any floss covered by the hoop) out of shape.
Second, ALWAYS wash your hands before you begin stitching, even if you think they are already clean. There are natural oils on your skin that can transfer to the fabric/floss and discolor it over time.
Third, replace your hoops if they start to get old and dirty - they're inexpensive, so don't be afraid to toss them! OR try plastic hoops, that you can clean.
Finally, if you're really concerned, put a piece of tissue paper on the face of your fabric before applying the hoop, then tear away the paper from the stitching area, leaving the tissue between the hoop and your fabric!
**********
I don't remember if it was the same site, but there was also a suggestion about using a sewing method to save time in stitching (this method requires pushing the needle down at the first point your stitch and up at the next point - in a scooping motion - before pulling the needle out of the fabric - so the needle basically stays on the face of the fabric).
There are a couple of problems with that - one being that if you ARE using a hoop and have nice taut fabric it can be very hard to get the needle to bend to the second hole, LOL, so it's a technique mainly used when sewing IN-HAND. However, the other problem is that instead of pulling straight up or down through the fabric, this method pulls the floss sideways, causing more wear on what is already a quite fragile product. Depending on the type of floss you are using, this can cause fraying.
Again, I want to point out that there is a time and place for everything, LOL, including "in-hand" and the sewing method. I use BOTH of these tecniques when working specialty stitches that require a bit of slack in the fabric, or manipulation of the floss. I just don't use them for cross-stitch!
***************
Next, someone else asked how to clean up messy backs - which is an excellent question... I was just sorry to see she was asking someone who posted a picture of the back of her work that had tails hanging every which way! As you may know if you read my stuff regularly (wink), TAILS are my pet peeve! I HIGHLY recommend anchoring floss firmly - a stitch or two is usually NOT enough. Go under 3-5 stitches - or even better, run the floss under 3 stitches, then change direction and run under 3 stitches in a different direction - your tails won't pull loose no matter what kind of treatment they get during washing - or if they are on a sweatshirt, worn and washed frequently!!
My second "tail tip" is to CLIP YOUR FLOSS close to the fabric - there shouldn't BE any straggly threads on the back of your fabric - I can't stress this enough, it's the most common problem I find among even experienced stitchers.
But my third (and BEST) suggestion for neat backs and ending tails, is to run the tail AWAY from any unstitched areas before clipping the floss. That way no naughty little fuzzies will be peeking out from behind your stitching and showing through the fabric when the piece is framed.
***************
My FINAL suggestion is that when you read something you didn't know, try to find other experts talking about the same topic and see how many of them agree, or what other options they suggest ... then try the various techniques offered, and decide which you prefer!
Happy stitching until next month!
06/2019 - TIP - LAYING TOOLS
For those of you who aren't familiar with this tool, it can refer to any object that helps you manage threads, or ribbon - anything material you want to lay flat (which is how it got it's name). Basically, you lay the tool UNDER the floss / ribbon or braid, as you pull the material tight, and use the tool to gently stoke the underside of the floss etc., which makes it spread out and lay flat, or smooth. It is especially useful for canvas work, and Kreinik recommends using a laying tool when working with their silk threads. Keeping the stitches smooth and even ensures a "maximum degree of uniform light reflection".
However, I was surprised to learn that QUILTERS use this tool (though they may call it a Stylus, Awl, or Stiletto) as well! When they are feeding fabric under the foot of the sewing machine, they use this tool to push the fabric (keeping chubby fingers out of the way of stabbing needles!!), or when they have tiny pieces to hold in position when doing applique, the tip of these slender tools is perfect - again, no chubby fingers blocking your view. And when there's a tight corner to be poked out... laying tool to the rescue!
But the laying tools we carry are so pretty that KNITTERS were buying them as well - to use as shawl or scarf pins. All in all, a very use tool indeed!
We used to carry some beautiful wooden LAYING TOOLS, which became unavailable for a time, as they were made by a family in Germany. Recently they came back on the market, so I am pleased to say we have them in stock... however, when they were unavailable, we began looking at alternatives, and created some cute metal laying tools with a small decorative cabochon and a dangling angel ornament! Both these styles of tools are now available on our website here: WOOD / ANGEL, and will soon have their own link under ACCESSORIES, on the top left side of our website.
HERE ARE SOME TIPS FOR USING A LAYING TOOL (note: some of these tips come from NORDIC NEEDLE's very informative Stitching Guides, as well as various YouTube tutorials I visited to gain insight into this interesting and useful tool!):
CROSS-STITCH / NEEDLEPOINT: Bring the needle/thread up from the back of the fabric as usual, but don't complete the stitch / leg. Lay the thread to the left, on top of the fabric. Keep the laying tool in your left (or non-dominant) hand, and use the side of the laying tool to stroke the thread AWAY from the starting hole, making it lay flat and smooth. This pressing motion may also spread the fibers slightly, giving you better coverage. Leave the laying tool pressed on the thread, an inch or so from the starting position, as you complete your stitch. Carefully pull the thread to the back of the fabric, forming a small loop around the tool. Keeping the tool firm against the thread, move it with the thread as you finish the stitch, removing the laying tool at the last moment, as the thread tightens.
Repeat for each stitch. Once you get a rhythm going it's pretty easy to do!
RIBBON: Another use for the laying tool is to slightly open the hole the ribbon will pass through, to help prevent wear on the fragile ribbon edges. When ribbon pulls through an opening it wants to curl, either in (concave) or out (convex). To prevent this, insert the laying tool in the loop formed by the two ends of the stitch, and again use the flat side of the tool to firmly stroke / hold UNDERNEATH the ribbon as you tighten it. If there is a twist in the ribbon, flatten the part you want to remain on top of the fabric, use the laying tool (underneath) to apply some pressure, and allow the twisted portion of the ribbon to pull through the hole first. Be sure that if the ribbon has a 'good', or shiny side, that this side faces UP (and does not lay against the fabric).
While many things can be used as a laying tool (large needles; or even plastic pick-up sticks in a pinch, LOL). However, be sure the item you use is sturdy (so you can apply pressure), and smooth (so your thread does not catch). It really might be worth investing in a proper tool to ensure you have one that is durable.
05/2019 - TIP - BULLION KNOT
The hardest thing I have found about Bullion Knots is that the instructions I found in many needlework stitch books didn't stress the importance of tension, or show you how to achieve it. Some time ago I saw a demo of the perfect way to do this stitch in 7 easy steps, so I'd like to share it with you this month.
Follow the quickie diagrams I whipped up (below), LOL, as I walk you through the steps.
Each stitch will have TWO positions that you need to know before you begin, a starting (A) and ending (B) point, with space in between. For the sake of this explanation I'll call A (TOP) and B (BOTTOM), but this stitch can just as easily be worked side to side (or turn the fabric so the stitch is oriented the same way as the diagram, if that's easier to follow).
Do not use a hoop when working this stitch, as you want to be able to 'scoop' the fabric at the beginning.
For best results, use a needle that is the SAME WIDTH from the EYE to the TIP (such as a Milliner's Needle).
Ready? Let's go!
1. Come up from the back of the fabric in the bottom (B) position. Hold the floss out of the way with your thumb.
2. Push the tip of the needle down in the top (A) position, then using a sewing motion, bring the tip back out the SAME HOLE you started in (B). DO NOT pull the needle through the fabric, leave it in place, from A to B.
3. Put your left thumb over the top of the needle (and the top (A) position), to hold it firmly in place, and with your right hand, wind the floss CLOCKWISE around the needle at least 7 times (if covering a space 2-3 stitches wide). Note that less wraps will make a stitch that will lay flat against the fabric, while more wraps will produce a humped stitch (like a caterpillar walking). You can wrap 10, 15, or even 20 times! The wraps s/b firm, but not too tight - remember you have to pull the needle and floss through them!
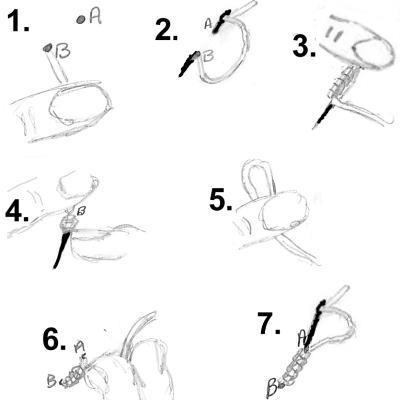
4. Keeping tension on the wrapping thread, use your thumbnail to gently push the loops down the needle, so they are sitting close together right by the fabric, at (B), the bottom hole the needle is coming out of. The wraps should stay SIDE BY SIDE, and not bunch up on top of each other!
5. Now move your left thumb, so it is on top of the wrapped portion of the needle, and with your right hand, gently pull the needle, and the end of the floss strand, so that the entire length of the strand is pulled through the wraps. NOTE: THE MORE WRAPS YOU HAVE, THE HARDER IT IS TO PULL THE NEEDLE THROUGH - be sure your wraps aren't TOO tight.
6. Move your left thumb, and with your right hand lift the wrapped floss strand towards the top (A), making sure the wraps stay tight together. If there is any part of the strand that HASN'T been pulled through the wraps, carefully ease the remaining length through the wraps. If you find you have pulled it too tight (and the holes are distorted), put your needle under the stitch and gently work it back and forth to pull some of the floss back in to the wraps. Again, the more wraps you have, the more hump your knot will have. With 7 wraps, the stitch should lay fairly flat.
7. Push the tip of your needle back down at the top (A) hole, and either anchor the stitch, or move on to the next starting position - or both! TIP: Anchoring the back before working another Bullion Knot will keep the first knot from pulling out of shape when you tug on the second one.
Didn't I tell you that was easy? If you want to see this stitch in action, there is a beautiful demo video on Youtube, and watch a wonderful stitcher make 9 wrap bullions, and more. She does a slightly different technique, so she can use a hoop, giving you another option! Do a search for BULLION FLOWERS, and find out how to make roses and all sorts of flowers with the simple stitch... Till next month...
04/2019 - TIP - MIXING DYE LOTS
It's happened to us all ... we get part (or most) of the way into a project and realize we don't have enough floss to finish the darn thing. So we get some more... but time has passed and the manufacturer has changed the color slightly, or it's just a different dye lot, and not quite the same shade as what we started with ... YIKES, what do we do now??
Now let me just say that DMC is pretty good about being consistent - except when they totally change a line of shades (like they did some time ago with one of their grey lines and a couple of blue greens), but that was apparently for reasons of "environmental regulation, that impacted the dying process" . But so many things can affect dyeing - temperature, or slight differences in dyeing times can all cause changes, as can exposure to sun or humidity, and even the age of the floss.
So, if you HAVE to get more floss, and the colors just aren't quite the same, don't panic there are actually several things you can do ... but try to decide how you're going to proceed BEFORE you get down to that last strand, as some of the options include various ways of blending the old and new...
First of all, look at the pattern... if the separate dye lots can be stitched in areas where they don't meet, then you probably don't have to worry about it too much, you can finish the current area with the floss you have, and use the new floss for the other areas.
However, if you are going to run out of floss, and need to continue with the new skein right next to the previous one, as I mentioned above, you have some blending options. Since most color differences are a matter of degrees, you can blend the new and the old in a way that is subtle, rather than glaring.
1. If you're working with two strands (2X) work with one strand (1X) from EACH skein or a few rows, before moving to the new skein completely... this blends the change into the new coloring and makes it barely noticeable... this is actually a good tip for ANY change from one skein to the next, to ensure a smooth color change and avoid any possible dye lot issues.
2. If you're working on an X's & Oh's design, and using three strands (3X), which I do quite a bit, start with 2X of the old, 1X of the new, next length 1X of the old, 2X of the new, until you get down to 3X of the new all by itself.
3. Another option is to scatter the colors together - start out with a row of stitches, where every 4th or 5th stitch is the new color. In the next row, make it every 3rd or 4th stitch, the next row every other stitch, and so on, until you are working completely with the new color. Only try this method if the color changes are very slight, or you could end up with a checkerboard look!
If anyone has any other tips for blending dye lots, let us know! Happy stitching...
03/2019 - TIP - HOW MANY STRANDS
If you work on many of my designs (X's & Oh's, in case you forgot, LOL), you may have noticed that I generally use THREE STRANDS (commonly written as 3X) in my designs.
Some times I work with varying numbers of strands - one strand in the background, for a soft focus, or half-stitched for an even softer look, say for sky or horizon. Two strands - or even one strand full-stitched - is often the next layer... maybe trees, or mid-background; while the main focal points of the design are worked with three strands, so they stand out.
Three strands cover white or black fabric more completely than the usual two strands, but it also depends on the size of your stitches! So I would use three strands for 14ct, and maybe even 16ct, but on smaller fabric then that I would reduce to two strands.
Just a reminder that the fabric count refers to the number of stitches per inch (so 14ct would have 14 stitches per inch).
What I generally suggest is that you take a scrap of fabric, or use the corner of the project fabric where it won't be seen (for example, where it will be tucked behind the picture when it's framed), and test the varying number of strands so you can decide how many you want to use.
Here is a great chart I found on-line some time ago, showing the different strand usage on different fabric... a great reference tool (unfortunately I don't know who made it, or where I found it, if anyone knows, please let me know so I can credit the creator). Of course it would be simple to create your own similar reference tool, with smaller hearts, squares or diamonds:
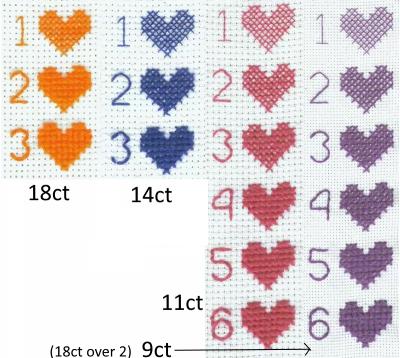
So you can see what a difference additional strands can make, but as I mentioned above, the best way to see for yourself is to do small test areas, say 10 or 12 stitches wide / high. Do a square of 1X, then a square of 2X, and finally a square of 3X, so you can see how the coverage improves as you go.
Up till now we've talked about using 1-3 strands, but (as you can see from the chart above) there are times you may want to use 4, or even 6 strands - yes, really! If you're working on a very large count (like 9 or even 7), then you also have to increase the amount of floss you use to cover that larger area! Once again do a test to see how many strands you need to use for best coverage.
BTW, if you like to use a loop start, then keep the number of strands even - so for example, try 4 strands (2 strands doubled); as always, you can use the number of strands indicated in a design, or you can do some experimenting and decide what works best for you! If you don't remember how to do a Loop Start (or never heard of such a thing), be sure to check out our 07/2017 Tip Blog!
Happy stitching...