Tips Blog
09/2017 TIP - VANDYKE STITCH
I like to learn new things... and today I learned a new-to-me stitch, called a VANDYKE STITCH, so I thought I'd share this new knowledge with you, LOL.
This is a braided stitch, most commonly used for edging, and can be worked free hand. However, being an avid cross-stitcher, I prefer to work on Aida to learn it, so that I can use the grid of the fabric to keep my braided band straight, and even. Begin by selecting your width spacing, and divide the space evenly into 5 sections. Either pretend your width is divided into 5 columns, or actually draw the spacing with a fabric marker designed to wash out or fade away. I have numbered these lines on the example below (and indicated the line spacing with dash marks), so you understand each step easily (for example, the first leg of the stitch goes up 1 stitch, from the bottom of line 1, across lines 2-3, to the top of line 4).
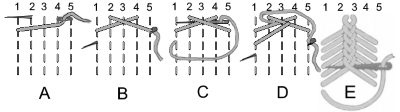
There are FOUR steps to this stitch (labelled A-D on the drawing below), which is worked from the top of the band, down:
STEP A: Begin at the bottom of the desired stitch width, on the first 'line'. In this instance, we are going to work 1 stitch high (and 5 wide), so begin at the top of the band to be stitched, on the far left 'line', down 1 stitch - come up from the back of the fabric at this point (see A below). Using a sewing motion, insert your needle at the top of the stitch, on 'line' 4. As mentioned above, in this example, that means counting 3 'lines' to the right (from your starting position), then up 1 stitch. The needle goes down at 4, then left 2 stitches and up at 'ine' 2, in the scooping motion shown (see A below). TIP: be sure you're using a needle that is long enough to reach across all 5 stitches!
STEP B: Cross the stitch you just made (carrying the thread to the right), moving down one space, and over to 'line' 5, to insert the tip of the needle. The right side of the stitch should be level with the starting position on the left side of the stitch. If you're stitching free-hand, move down the height of the stitch you just made (in this example 1 stitch on the Aida), and bring the needle back to the front of the fabric at this point - all the way across the width of the stitch (see B, below). This will form an X with a wide bottom and narrow top, and your floss will be at the starting position for the NEXT stitch.
STEP C: This is where you start making the braid! Feed the needle UNDER the cross-over of the X you just made, being very careful not to catch any fabric, or any of the previous stitching (see C below). TIP: use a blunt tipped Tapestry needle, to avoid splitting any of the threads.
Just a note at this point, about the importance of keeping your tension even, so the centre braid is tidy.
STEP D: To finish the stitch, and form the braid, move straight across to 'line' 5, so you are once again even with the bottom of this stitch, and repeat Step B. Repeat C and D down the band, and the braid will form, looking something like E (below).
Notice how the needle continues to go under the stitches as you work - but NEVER catches any fabric or previous stitching in this pass-through. Give this lovely stitch a try, and see how you like it!