Tips Blog
07/2017 - TIP - LOOP START
Last month I mentioned I would explain a LOOP STARTS to you, and if you've never tried this before, I think it will become a favorite! This is a way to begin stitching with NO tail - what could be better than that? It works best with even numbers of strands, so if you're working with 2 strands (2X), 4 strands (4X), or even 6 strands (6X), this is the method for you!
Begin by cutting a length of thread TWICE AS LONG as you would normally use - so if you like an 18" floss length for stitching, cut a 36" length. Remove half the number of strands of threads you want to stitch with from the length. So, for example, if you want to stitch with 2 strands (2X), remove ONE strand from the extra long length you just cut.
Fold the separated strand(s) in half, so the raw ends are together (you will now have double the strands to stitch with). Feed the RAW ENDS through the eye of the needle - the fold in the floss will form a loop at the tail end of the floss.
Come up from the back of the fabric in your starting position, but leave 2-3" of floss on the wrong side of the fabric. Go back down in the second stitching position (forming a 1/2 stitch, / ), and thread the needle through the loop at the end of the length of floss. NOW gently tighten the floss - and your thread is anchored in place, with NO tail!
Here's a pic for those of you who are more visual learners (wink):

This is an especially useful way to begin a thread when you're doing lettering, which can be quite thin and hard to hide tails in! That's it for this month... happy stitching!
06/2017 - WASTE KNOT, WANT KNOT! TAIL TIPS & TRICKS
Most stitchers are good with hiding starting tails, they either use a LOOP START (come back next month, and we'll cover this quick trick for anchoring with NO tail), or they run under a few stitches of a previous row, or they stitch over the first few stitches of a new length of floss.
Here's another way to begin - and this is actually a technique borrowed from Hardanger! Use what is called a 'waste knot'. To begin, tie a knot at the tail end of a new length of floss...
Step ONE: push your needle down through the FACE of your fabric, well away from where you intend to stitch. You want the knot to be on the face of your stitching, and at least 4-6" away from your starting position, so you have a good length of floss to work with later on (NOTE: you need enough length to thread through a needle and run under AFTER you stitch).
Step TWO: bring the needle up from the BACK of the fabric in the starting position, and just begin working - remember the tail is pulled off to one side and anchored by that knot, so you don't have to worry about stitching over it. When you reach the end of the current stitching length, run the tail under as you would normally end off. (NOTE: you could also use this method to 'hold' your tail in place while you stitch over it! Anchor the floss w/in a couple inches of your starting point, and in the direction you will be stitching. Stitch over the tail on the back of the fabric as usual - just snip the waste knot off after once you've worked a few stitches, so the tail is anchored, but the knot isn't making a lump in your stitching. This is a great method for those who find it awkward to hold tails, or are having slight hand problems).
NOW, Step THREE: go back to that knot holding the beginning of the length of floss out of the way. Lift the knot off the fabric slightly, and cut it off (you're 'wasting' it, get it, LOL, that's why it's called a 'waste knot'). On the back of the fabric, pull the floss you just cut to the back, and thread it through a needle (now you see why it's important to leave a long enough length!). Run the tail under your stitching, and there you have it, both ends are now tacked down.
This method does use a bit more floss than simply stitching over the starting thread, but when you get good at it you can actually use the knot to anchor the floss where you can stitch over it, and just cut the knot off when you get to it, and keep on stitching!!
Here are some other starting tail tips - it's important to anchor beginning tails well, so don't be afraid to run the starting tail under several stitches. If possible, I anchor my tails under 4-6 stitches, and if I don't have that many I weave the tail around 2-3 (laying my stitches side by side, not on top of each other - you don't want a bump!). Actually, if I'm using a single strand of floss (say for backstitching), I generally run my thread under some stitches, then loop it around part of a stitch just before the spot I plan to begin working - that way the thinner thread is less likely to pull out on me. This method is also handy for delicate flosses - like blending filaments!
OK, that's all well and good for starting, but how can you end neatly and securely? First of all, always run the tail AWAY from the edge of the stitched area - especially if there is open fabric showing at the edges. This is even more important when working on light colored fabrics with dark floss. Trust me, those wee bits will show up like a sore thumb when the piece is framed, if they aren't dealt with properly!
If the piece is going to take some abuse (for example, stitching on a sweatshirt or tablecloth or topper), it's a good idea to run the tail in 2 directions - so run under 3-4 stitches, the turn in an L or even a U, and run under 3-4 more stitches. This ensures that the tails will stand up to a little abuse - such as the twisting and pulling of being washed. I actually like this technique so much I use it even on regular needlework - tails that are too short, or not run under properly, may pull out even during the gentle washing/pressing before framing!
While this next tip isn't exactly about tails, it is about floss showing through fabric... and that's carry threads. YOU know what I mean, those little lines of floss sneaking across the back of the fabric from one letter to another on the text of a design (for example). These too will show through light fabric, ESPECIALLY if the thread is dark. Though it takes a bit more time and effort, it looks much better to end the floss on each letter, and start it new on the next letter - this is where a LOOP START is a great help, as I mentioned last month. Can you tell that tails and carry threads are a pet peeve of mine, LOL?
My final thought for today is that once those tails are securely run under and anchored in place, pull the remaining floss length away from the fabric, and clip the floss as close to the fabric as you can get w/o damaging your stitching. DO NOT leave little tufts of tail hanging out - and especially near unstitched fabric areas, as they WILL come back to haunt you when the piece is framed (and they show through the fabric, ruining the nice clean edges of your design).
Happy stitching!
05/2017 TIP - 1949 REVISITED!
I actually published this amusing piece of history several years ago, but there are so many new people visiting (and signed up for my newsletter), that I thought they'd enjoy reading it - and those of you who've seen it before will get a kick out of reading it again, I'm sure...
So, this is actual advice from a SINGER SEWING MACHINE MANUAL, back in 1949. Enjoy!
Prepare yourself mentally for sewing. Think about what you are going to do... Never approach sewing with a sigh or lackadaisically. Good results are difficult when indifference predominates.
Never try to sew with a sink full of dirty dishes or beds unmade. When there are urgent housekeeping chores, do these first so your mind is free to enjoy your sewing. When you sew, make yourself as attractive as possible. Put on a clean dress. Keep a little bag full fo French chalk near your sewing machine to dust your fingers at intervals.
Have your hair in order, powder and lipstick put on. If you are constantly fearful that a visitor will drop in or your husband will come home, and you will not look neatly put together, you will not enjoy your sewing.
OK, whatcha' think? Personally, I don't wear lipstick at any time, LOL, I've never considered any 'housekeeping chores' URGENT, and I didn't know what the heck French chalk was until I googled it (it's a soft white talc used by tailors, and dry cleaners for removing grease spots), so I don't think I'll be taking this advice any time soon!
Back at you next month... happy stitching!
04/2017 TIP - 3/4 vs 1/4 (2)
S0 a QUARTER STITCH is literally 1/4 of a full stitch - just one of the 4 arms of an X, worked from the corner indicated by the symbol on your pattern, into the centre of the stitch. Unfortunately, this does not always provide the best coverage. For example if you have a line of quarter stitches all together, as shown in the graph to the left below (which includes backstitching), they would look similar to the example on the right, when stitched:
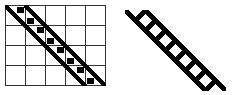
As you can see, there's a LOT of fabric showing with this type of stitch. Now one way to remedy that is to increase the number of strands being used. More floss equals better coverage, which is one of the reasons I just LOVE using 3 strands of floss (3X) in my designs... However, if you do a THREE-QUARTER stitch, rather than a quarter stitch, you get the kind of coverage shown below:
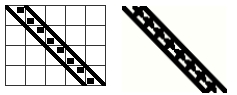
Quite a difference isn't there? Well, let me share the best way to do a 3/4 stitch, LOL, as there is a great 'trick'. Make a HALF-STITCH in the direction of the 2 diagonal symbols on the graph, then work the quarter stitch from the remaining corner, OVER the half-stitch, into the centre, like this:

The best reason for doing this is that it anchors the stitch, so if you have backstitching, none of the stitching will slip out from under the backstitched edges and blur your outlines. That's it for this month... happy stitching!
03/2017 TIP - FINISHING OPTIONS
It's been a while since we looked at ways to finish our needlework other then framing... and boy, is there a lot to consider! What about... pillows, sweatshirts, Christmas stockings, bibs, hand-towels, box lids, ornaments, and one of my favorite finishes for small designs - cards! In this blog, let's take a closer look at cards...
While you can frame a small design, using the card as a mat, these also make excellent gifts or remembrances, that are sure to be treasured - and since they're small, they're also very easy to stitch! X's & Oh's has a good assortment of cards with different size openings - square, rectangular, round, oval, and even heart shaped... most of which come in large or small card sizes - and even include an envelope, so you can mail your finished gift to a friend. We also have a couple of charts of designs that are suitable for the larger cards, but we also have what we call STITCH NOTES, which are a card, perforated paper (to stitch on), envelope, and design, all in one package!
I mentioned perforated paper, and this is one of the best options when making cards. While you CAN use fabric, it is harder to keep it in position and stretched flat, than the paper, which is made for this purpose. This evenly spaced heavy stock paper comes in various counts - just like fabric - though it can be hard to find sizes other than the most common 14ct! While a cream color is most popular, we have some sparkly silver or gold in stock (perfect for holiday stitching), and other colors can be special ordered if desired.
The cards themselves are "tri-fold", which means they have 3 folds, with the extra fold holding the stitching centered in the opening on the centre fold of the card. Since the stitching is attached to this extra side flap, when it is folded over (so the stitching shows through the hole cut in the centre), the other side of the piece the stitching is attached to, becomes one side of the inner card, which leaves the other fold to form the back leaf of the card (booklet style). That might seem more complicated than it really is... basically, one side of the card is folded in half, with the stitching sandwiched in between - so the face of the card is a double thickness (even more if you count the stitching).
If you are using Aida, be sure the fabric is firmly attached to the inner card with tape, applied so only the fabric and stitching show through the opening.
If you want to make your own card (a plain book style card with only 2 flaps), make a fringe around the edges of the stitching (by removing some of the edge threads). This way, the fabric can sit on the face of the card and look quite decorative. You may want to work a zig-zag or hemstitch around the edges (at the base of the fringe), or apply a bead of white glue at the base of the fringe on the back of the fabric, to stop the fabric from fraying.
We've also been playing with the Kreinik IRON-ON braid on cards for a Make-It-Take-It project for the Creativ Festival, but that's something for another tip! Happy Stitching...