Tips Blog
TIP - PAPER EMBROIDERY
Since I recently released a new design on PAPER EMBROIDERY, I thought I'd spend this blog giving you a "brief history and how-to" on this interesting technique! Paper piercing has been around since the 1700's, though originally designs were created by making larger and smaller holes, with actual stitching being added later. In the 1970's Pierre Bezier set out to prove you could make a curve using a series of straight lines, and to teach this theory, school teachers invented string art!! While you can use almost any type of embroidery stitch on paper, the style that has me most intrigued is that influenced by string art!
OK, so that's your history... now for some how-to! I print my templates (or patterns) right on the back of the cardstock I want to use for my stitching, and will have kits available before Christmas, if you're thinking of a stocking stuffer (wink). However, you can also purchase reusable templates, or download them off the internet and print them on regular paper.
If you're using paper, lightly tape the template in position on the back of the cardstock, so it DN shift as you punch. Lay the cardstock face down on a piercing pad - you can purchase a pad, or use an old mouse pad or piece of cork - I use 3 layers of felt, on a clipboard, so it is both cushioned and mobile!
When you begin piercing, hold the tool as upright as possible, and pierce at each dot on the template as accurately as possible. Again, you can buy a piercing tool, or you can use a long needle (though I found that very hard on the hand). We made our own tools by inserting a fine needle (like a #26 tapestry needle) in the end of a small length of dowel! Hold the cardstock up to the light from time to time, to check that all holes have been pierced. BE SURE ALL THE HOLES ARE DONE BEFORE YOU REMOVE THE TEMPLATE!
Note that most patterns for paper embroidery are small - card or ornament sized - because you can't clean and press the paper once you're finished, so the background has to be kept as clean and undamaged as possible!
Because the patterns are small, one strand of embroidery floss is often enough - though you may want to play with the look of various numbers of strands, to make a particular design pop! There are no knots on the back of the work, tails are fastened in place with tiny pieces of scotch tape! Since you're using a heavy paper to stitch, the thread won't show through, so try to anchor outside the stitching area as much as possible.
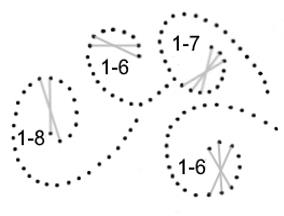
Stitching instructions are generally provided in cryptic notes, such as 1-6. This means come up in the first hole, then count six holes from the starting point (NOT including the starting hole), and that is where you go down to the back of the cardstock, and that is how long each stitch on that particular motif will be. If there is a mirror image motif (that DN have instructions), it is stitched the same way (or reversed). If you're working on an open curve, start at one end. If you're working on a closed motif, and a starting position is not indicated, then you can start anywhere on the circle, but work all the way around. You will often find that every hole maybe used twice (on a closed motif), or that some holes .
Let me give you a little diagram to follow, to make the next part easier (wink). The diagram (below) has a stitch length of 1-11, and is being worked clockwise. This means we started at the top (1), and counted 11 holes clockwise, before going to the back of the cardstock, and all the stitches will be this length. However, unlike say Satin Stitch, we are not going to go back to the starting position, instead we will continue to the NEXT HOLE clockwise (3), then cross the motif on the face of the cardstock, to go down in the NEXT HOLE clockwise (4) from our starting position (1).
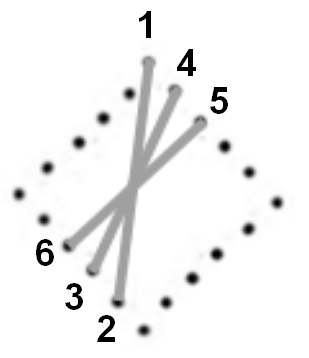
We'll continue in this manner, moving one hole clockwise from where we went down (at 4), to come up (at 5), and we'll move clockwise to the next hole (6) from the last stitch on the opposite side (3), to go back down. We'll keep stitching in this way all the way around the motif. By the time we reach the bottom hole of the diamond, holes (1) and (4) will have to be used a second time, so the design may call for you to continue around until EVERY hole has been used twice, before stopping. (Just a designing note, in case you want to make your own template... a pattern with 2 less holes on the left side of the diamond would end with the final bottom stitch in that last unused hole before (1)!).
So when you look at the back of your stitching, there is a bare minimum of thread - it's all on the front! Also remember that the template on the back is a mirror image of the face of the stitching, so if you want the stitching to go clockwise, you have to count COUNTER-clockwise on the back!
One final tip... if you run out of floss and are adding a new strand by end on the back and starting the new strand in the next hole, wait and tape the ending tail down at the SAME TIME as your new starting tail, to keep the amount of tape on the back to a minimum.
Here's a wee pattern for you to try out. Print the template so it's about 2" high. The different stitch lengths will let you see how the length affects the look of the stitching. And if you enjoy this new technique, watch for additional designs coming soon!