How to Cross-Stitch
SIZE OF CLOTH REQUIRED: Your pattern will give you a finished size for the project on the count aida cloth you are using. Check this measurement, then add 3" (7.5 cm) to each side to allow for framing. If you want to add a mat etc., you may want to add even more. Its better to have too large a piece of fabric, rather then too small!
FINISHING EDGES: Once you have cut your fabric to the size you require, finish the edges to prevent them from unraveling. You can tape each side with masking tape, but I prefer to zigzag stitch my edges on the sewing machine.
CENTRE PROJECT: Find the centre of your project by folding the fabric in half lengthwise, then again width wise. The corner of the fold is the centre of the fabric. Your pattern will indicate the centre lines with arrows. Begin stitching as close to the centre as possible.
ANCHOR THREAD: Stitch the first few stitches over a 'tail' of floss on the back of your fabric (approximately 1" (2.5 cm). Each time you end a length off, run it under several stitches (on the back side of your project).

HALF STITCH: The beginning half of a full cross-stitch creates a half stitch. Working from right to left, bring the needle up from the back at position 1, down at 2, up at 3, down at 4, etc.
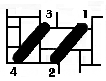
FULL CROSS-STITCH: Begin as above (half-stitch), working from right to left (as shown). Complete the stitch by returning from left to right. Bring the needle up from the back at position 5, down at 6, up at 7, down at 8, etc. Be sure the needle goes up and down in a corner hole cleanly, so that none of the threads from previous stitches are split apart.

TIP: It doesn't matter if you stitch left to right, right to left, or top to bottom, as long as all your bottom half stitches lay in one direction and the finishing top cross stitches lay in the opposite direction.
QUARTER STITCH: Most cross-stitch terms are exactly what they imply. So a quarter stitch is one quarter of a full cross-stitch.
Four different quarter stitches are shown below (from each corner of the stitch). The position of the quarter stitch will be indicated on the pattern. Starting from the corner of the stitch, come up from the back of your fabric. Push the needle down through the centre of the stitch.
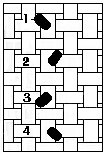
TIP: You may prefer to use a pointed needle for quarter stitches.
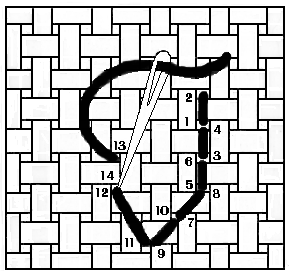
BACKSTITCHING: This is the outlining stitch used to finish your project. Backstitching is always done LAST. It is usually done with one strand of floss, two shades darker than the area to be outlined.
Your pattern will indicate back-stitching with darker or colored lines. Follow the diagram below, coming up at position 1, down at 2, up at 3, etc. Backstitching should be done in a smooth, continuos line, each stitch touching but not pulled too tight, with no gaps.
FINISHING: When all the stitching is completed, wash the piece in warm water with dishwashing liquid. Swish gently for several minutes, then rinse with warm water. Roll in towel and squeeze dry - do not wring. Press with hot iron face down on a thick towel until dry (lift iron, do not pull across fabric). Frame as desired.
TIP: Make a photocopy of the pattern before you begin stitching, and color in each row as you stitch. This will not only help you keep track of where to stitch, it will leave you with a clean copy of the pattern to use for backstitching.