Tips Blog
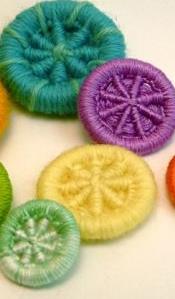
TIP - DORSET BUTTONS
Once again you can thank my needlework guild for this months blog! One of the ladies asked me to find her some 'how-to' written instructions for DORSET BUTTONS, and I had such fun researching it, I thought I'd share them with you.
These are basically covered and woven rings, that can be made large or small, and which you can use for actual buttons, or for ornaments, or for earrings! There are some great tutorials on-line, but the one I would recommend is at a website called craftstylish.com, which had clear instructions, with lots of step by step pics.
For beginners, a larger ring (1.5 - 2.5") is recommended. You can use 6-strand embroidery floss; pearl cotton or yarn to cover the buttons, so a lot of variety is possible, but we're going to call it YARN here, no matter what you use. The only MUST is that the ring has to be solid - no breaks in it, which is why the curtain rings available from craft and fabric shops are perfect for this. You will also need a tapestry (blunt) needle, with a large enough eye to accommodate your yarn.
I'm going to cover this quickly, so I do recommend following the link above, to see step by step pictures. You want a long length of yarn, so you don't have to add pieces and hide tails. 4X the length of your arm has been suggested, or roughly 100 inches.
Cover the ring very completely with BUTTONHOLE or BLANKET stitches (see my tutorial on this stitch, if it's unfamiliar).
Once there is no ring showing anywhere, and notice that you have a ridge all around the outside edge of the ring. Gently work at rotating the yarn, so that outer ridge is IN THE CENTRE of the ring. The 'tail' of the thread will be dangling down, inside the ring.
Wrap the yarn around the ring several degrees apart, to form spokes. For beginners, start with 8 spokes, though for larger buttons you can add additional wraps. Note that one side will look like a wagon wheel, with nice even spokes, but the other side will have wraps closer to the outer edges.
When all the spoke wraps are complete, turn the button over, so you're working on the side where the wraps are not even (the BACK of the button).
Slide the needle under the two spokes closest to the edge, and give a tug. Pull the yarn to gently tug the off-centre spokes into the centre, and repeat with the other spokes, until the spokes on this side is lined up as well as the FRONT. Note that you will have to hold the yarn tightly until a bit of the weaving is completed.
Flip the button to the right side, and begin weaving by bringing the needle up from the back on the LEFT SIDE of the nearest spoke, and going down on the RIGHT side of that spoke. Pull the yarn snug.
Now move to the next spoke to the LEFT (yes, you are going counter-clockwise, past your starting position - this is what give the 'raised' look to the stitch), again, come up on the left side of the spoke, go down on the right side of the spoke, and move to the next spoke on the left. Repeat until the entire button is covered in weaving, pushing the stitches on each spoke together every once in a while, to be sure they are nice and tight.
When the stitching is complete, run the tails under on the BACK of the button. To attach, simply stitch the centre of the button, to anchor. Enjoy this stitch - I'd love to see what you make with it! Happy stitching...